
One of my resolutions for the new year is to eat well. Let me explain (hopefully without boring you to tears).... For the first two weeks of January Neil and I went vegetarian. Anyone that knows Neil will be in utter shock that he could last two weeks without meat of any sort. It's not that we don't want to eat meat we just wanted to teach ourselves that meat does not have to be a daily part of our diet. From now on we'll be much more selective about the meat we buy. As we'll be eating it less often we'll be able to spend a little more on the quality. We'll be aiming for meat that is as local as possible, organic and high welfare or no meat at all. We've already figured out the huge benefits of having a crab pot and a freezer full of fish we caught (thanks to my dear brother Dan taking Neil fishing!) And just for the record, Mcdonalds is OFF the menu! FOREVER! :) You'll have probably noticed that I've been leaning towards coconut oil and nut milk instead of dairy but again, that doesn't mean no dairy at all. We've discovered that making our own butter is actually more cost effective than buying butter in the supermarket. In our part of the world organic butter is much more expensive than organic cream. So we go and buy some organic heavy cream and turn it into lovely organic butter! For all of those of you thinking "what a load of hassle, I'd rather just buy it" pleeeease read on and pleeeeeease try making your own butter just once, it's so flippin easy you'll be gobsmacked!
Here we go.....
Step 1- Take your cream out of the fridge and leave it to stand for about 30 minutes so that it reaches room temperature. If you don't do this step it's going to take you a lot, LOT longer to make your butter.
Step 2 - Take a large jar, as large as you can comfortably hold in one hand. Fill it just about half way with your heavy cream.
Step 3 - Shake, shake and shake some more. Shake it all about so that the cream is swooshing around from top to bottom of the jar.

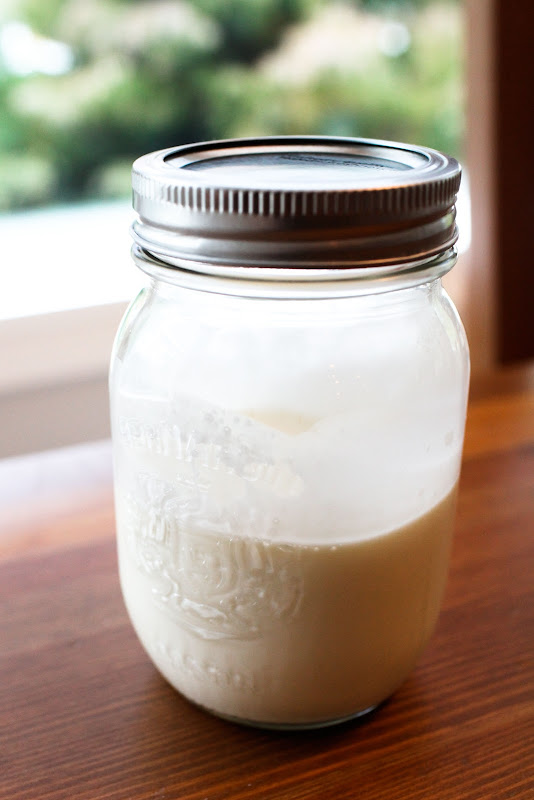
Step 4 - Keep shaking. Don't stop. At some point the sensation will change and the swooshing sound will stop. At this point you have made whipped cream. Keep shaking!!!
Step 5 - Keep shaking. all of a sudden the sensation will change again, you'll begin to feel a slopping sound as if you have a solid lump in thin liquid thumping the top and bottom of the jar as you shake. You have officially made butter!! Stop shaking.

Step 6 - Open the jar and carefully strain the liquid into a cup. This is buttermilk and you can use it in baking some scones or some other yummy thing or as a base for a creamy salad dressing.
Step 7 - Put some cold tap water into the jar with the solid buttery lump and swoosh it around. drain off this water and repeat a couple of times until the water runs clear.
Step 8 - Plop your buttery lump out onto a wooden board and press down on it with the back of a wooden spoon to squeeze out any remaining buttermilk. If you don't squeeze out the buttermilk it might make your butter go sour. At this point you can decide to add salt or not. For this quantity I'd add about 1/4 teaspoon and mix it up with the butter in a bowl.
Here we go.....
Step 1- Take your cream out of the fridge and leave it to stand for about 30 minutes so that it reaches room temperature. If you don't do this step it's going to take you a lot, LOT longer to make your butter.
Step 2 - Take a large jar, as large as you can comfortably hold in one hand. Fill it just about half way with your heavy cream.
Step 3 - Shake, shake and shake some more. Shake it all about so that the cream is swooshing around from top to bottom of the jar.
Step 5 - Keep shaking. all of a sudden the sensation will change again, you'll begin to feel a slopping sound as if you have a solid lump in thin liquid thumping the top and bottom of the jar as you shake. You have officially made butter!! Stop shaking.
Step 6 - Open the jar and carefully strain the liquid into a cup. This is buttermilk and you can use it in baking some scones or some other yummy thing or as a base for a creamy salad dressing.
Step 7 - Put some cold tap water into the jar with the solid buttery lump and swoosh it around. drain off this water and repeat a couple of times until the water runs clear.
Step 8 - Plop your buttery lump out onto a wooden board and press down on it with the back of a wooden spoon to squeeze out any remaining buttermilk. If you don't squeeze out the buttermilk it might make your butter go sour. At this point you can decide to add salt or not. For this quantity I'd add about 1/4 teaspoon and mix it up with the butter in a bowl.

Step 9 - Once you've squeezed away the rest of the buttermilk, use the wooden spoon to shape your butter into a block or any other fancy shape you might like. Wrap it in some grease proof paper and pop it into the fridge.
You just made butter! Woohooo! All we need now is our very own cow.
:)

No comments:
Post a Comment